Tuesday, June 23, 2009

Hand Bound Sketch Books - A Gift for that special artist

Hand Bound Sketch Books by Trevor Gieske
Show and Sale, Saturday, June 27th, 10am - 5pm
The Ant Hill, 148 - 10th Street N.W.
Calgary, AB


Recently I had the pleasure of meeting a young, self described 'budding, self-taught artist who was born and raised in Calgary" by the name of Trevor Gieske.
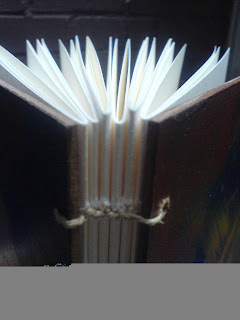

Trevor makes hand bound sketch books, often collaborating with another artist in his thoughtful creations. He showed me a beautifully crafted journal he'd made for a Calgary illustrator. On the cover was a stunning illustration by the artist who'd commissioned Trevor to make the journal for her. It contained rag papers that any artist would long to make their mark on. This journal was artfully bound by hand, by Trevor. It was truly remarkable and breathtaking.

I asked Trevor to send me some photos of his books so that I could post them here to show you. This book in the photo is 8"x10" with acrylic painted masonite panels for the cover which conceals 130lb, 25% cotton sheets that have a toothy, rough vellum surface suitable for a variety of mediums. Makes my fingers twitch just thinking about it.

I couldn't help but be impressed with the sensitivity and enthusiasm in which Trevor approaches his art of bookmaking. And the notion that he is keeping a lost art alive wasn't lost on me, either. What occurred to me is that Trevor quite possibly has created the one and only perfect gift for the artist!

A journal that is a work of art in itself, just waiting for inspiration to fill its pages.

If you'd like to see Trevor's work, be sure to stop by his show on Saturday June 27th. Or if you happen to miss it, but would like to special order a journal for yourself or for that special artist in your life, you can email Trevor at trevorgieske@gmail.com

Check out my workshop in the post below! More information to follow soon...

Saturday, June 20, 2009

Workshop Announcement - Fall, 2009

Bobbi's Studio

Several years ago, my studio was not only my own workspace, but a thriving environment for my students, as well. With weekly classes and frequent weekend workshops in both oil and watercolour, it was a hustling, bustling space filled with creative energy and a place where many lasting friendships were formed. Five years ago, I set the teaching aside to concentrate more fully on my own work, but I did promise that one day I would come back to teaching, something I have enjoyed immensely.

Well, I'm very happy to report that I will be resuming my oil painting workshop schedule beginning again this fall, 2009. I have many exciting ideas in mind to share - from painting the landscape en plein air to painting the figure -and I'm looking forward to welcoming back many of my former students and to meeting new ones.

In my oil painting workshops you will be painting from life from live models and still lifes, all set up under the beautiful north lit windows of my spacious studio.

Coming up: September or October, 2009
Painting the Still Life, from life
Skill Level: Intermediate to Advanced
This will be a two day, weekend workshop with a demonstration by the artist
Details to follow. Maximum 7 students.

To learn more about my workshops and to be added to my workshop mailing list, or if you have any questions,please send me an email at bobbi@bobbidunlop.com. If you are a painting group and would like me to teach in your own creative space, please email me, also.

News of upcoming workshops will be posted here and on my website at Bobbi Dunlop Fine Art You can also see demonstrations of my painting process at Dunlop Demonstrations and in the post below....

Saturday, June 6, 2009

"Turkish Urn with Oranges" - Step Seven Demo - Completed Painting

Step Seven: Completed Painting

"Turkish Urn with Oranges", 22x26, oil on Belgian Linen

SCROLL DOWN TO SEE THE COMPLETE DEMONSTRATION

Here is the completed painting, "Turkish Urn with Oranges". You can see in this photo that I have, indeed, set the table edge back somewhat and I am happy with this change. There is also more push and pull to finish this painting to my satisfaction.

I'd like to point out, however, that this final photo was taken by professional photographer, Geoff Williams, who has become a genuine friend. I have bragged about him in previous posts, but the photograph he has taken of this painting speaks volumes about his talent as a photographer.

I hope that you have enjoyed this demonstration. I hope to have more for you in the near future.

Just to remind you, you can click on each of the images here and this will give you a full screen, up close view of the painting (something all artists love to do with art!). I might caution you, though, use the 'back' button on your browser to return to the blog.

If you have any further questions or comments, please don't hesitate to contact me at bobbi@bobbidunlop.com I'd love to hear from you!

Please visit my other blog at Dunlop Demonstrations and my official website at
Bobbi Dunlop Fine Art

"Turkish Urn with Oranges" - Step Six Demo

Step Six: "Turkish Urn with Oranges", 22x26, oil on Belgian Linen

The final touches are being put into place....the little ochre pot now has its handpainted pattern and the windmill pattern is now painted onto the miniature china cup - bringing them both to life. The grapes on the left hand side are set back into the depths where they are merely hinted at.

There is quite a bit of glare on these photos from my north window, unfortunately, on the left side of the canvas. You can also see areas that appear flat where the paint has dried to a dull finish. The painting is coming together but still I am unhappy about the brightness of the table edge so I plan to do something to set it back. A little glaze ought to do the trick.

On to Step Seven...

"Turkish Urn with Oranges" - Step Five Demo

Step Five: "Turkish Urn with Oranges", 22x26, oil on Belgian Linen


The little ochre pot is getting its due attention now and the leaves are further developed. The medicine bottle is pretty much completed. I love to paint things like this that just seem to paint themselves.

On to Step Six ...

"Turkish Urn with Oranges" - Step Four Demo

Step Four: "Turkish Urn with Oranges", 22x26, oil on Belgian Linen

In this photo, once again, you can see the refinement in all the areas. I like to work all over the canvas as this allows me to see my concept coming together as a whole. It also allows me to see when my ideas are not working and changes need to be made. In addition, I am also often able to see the opportunities which present themselves which will make the painting more beautiful. I love it when this happens! Many years as a watercolourist tuned me in to this philosophy. As all artists who work in this medium know, watercolour is often done by the seat of one's pants. It's a medium in which many accidents are beautiful things! In turn, with oil painting, it's important to be not only open to these possibilities but also on the lookout for them.
I have painted the little medicine bottle on the righthand side, as well as the leaves and the grapes. You can see the grapes on the left hand side now, as well as the greenery behind them. I've also resolved the bottom table edge issue, it would appear.

On to Step Five...

"Turkish Urn with Oranges" Step Three Demo

Step Three: "Turkish Urn with Oranges", 22x26, oil on Belgian Linen

Again, more paint, more refinement going on. I'm continuing to concentrate on edges, paint quality, my original concept. With each little refinement, however, something needs to change, improve. You can see the patina of the urn becoming more developed and therefore I'm making decisions about just how to best place it into the surrounding space. I've done two things, in repainting the background. I've restated the background colour and also added a darker value to the left side of the urn and resolved the value of the area surrounding the ochre vase. I've also painted the leaves somewhat and at this stage wanted them to be seen as part of the design but not necessarily take over the painting on the left side, detracting from the flow. Everthing is refined a little bit more, including the grapes and the table top - both at the back edge and the lower portion. I'm still not sure at this point how the bottom portion of the table will resolve itself. I've kept it painted very simply in order not to'close myself in' with too much paint, meaning limiting my options. The biggest impact is in painting the miniature china cup which just seems to illuminate the scene...this was my hope so I'm happy about that. This also allowed me to put the burners to the other colour, such as the oranges.

On to Step Four....

"Turkish Urn with Oranges" - Step Two Demo

Step Two: "Turkish Urn with Oranges", 22x26, oil on Belgian Linen

In this stage you can see that the urn has been somewhat more refined with paint. This will be an on-going process throughout the painting. In addition, I have established the value pattern on the little ochre vase on the left hand side of the painting. This, too, was an on-going proposition, as I changed my mind about the lighting of this little gem. At one point, after step one, I set this vase back into the background only to change my mind and repaint it back into the light. It was just far too charming to leave out entirely. I got more paint on just about everything, it would appear, with the exception of the miniature cup. The orange segments have been restated, as has the larger orange itself. These are little stepping stones throughout the painting. Most importantly, though, is that I'm trying to come to terms with the background. This will become a back and forth proposition for me, unfortunately. The reason is that I often 'make up' the backgrounds. In other words, it isn't exactly what I'm looking at on my stand in front of me. Or I just change my mind. It's never straight forward, whatever the case. While I have a concept in mind at the beginning of my painting, there are endless possibilities that present themselves along the journey and I find too many of them irresistable! The beauty of oil painting is that everything can be repainted and one cannot be afraid to make changes. It all comes down to what makes a painting more beautiful. Once I made a statement about the background quality I thought hmmm, what if? And this is how I arrived at the palette knifed surface of the table ledge.I like it so it'll stay as is ... for now ;)

At this stage, as in all stages, decisions are being made about paint quality, edges and colour saturation. You will notice that the darks are smooth and often transparent while the lighter and brighter colours are opaque and often have impasto qualities. The joy and beauty of painting for me is just putting the paint on the canvas....

On to Step Three....

"Turkish Urn with Oranges" - Step One Demo

STEP ONE: Turkish Urn with oranges, 22x26, oil on linen

As mentioned in my original post about this painting, I discovered this Turkish Urn at a market several months ago. In particular, what inspired me to paint the urn was the lovely worn patina, its understated poise and grace, enhanced by the passage of time. With these thoughts firmly in mind, I placed the worn urn on my still life stand.

A still life concept can come together very quickly or it can take hours, even days, to accomplish. This particular concept did not come easy for me. Everything I loved about the urn seemed in contradiction to those objects placed on the table to enhance the beauty of it. Soon I realized that the utilitarian nature of the urn dictated not a still life of delicate objects at all. Simplicity was in order. No frills.

In keeping with the order of simplicity, this painting is built upon a limited palette of colour and non-colour. With the exception of the urn and the miniature cup, it is very much about earthy yellows, orange and green. The vivid orange colour also serves to complement the blues of the urn, emphasizing the delicate miniature cup with its blue painted windmill pattern (my tribute to Rembrandt).

As always, with my studio paintings, I began this painting on an oil primed linen which I'd previously toned using burnt umber and phthalo blue. I should add that I prepare all my surfaces myself. In this case, I've used raw Utrecht Belgian linen which I've prepared by hand - you can see a demo of this on this blog in an earlier post. In addition to the Utrecht, I use Fredrix "Kent", oil primed Belgian Linen and to this surface I add a coat of Williamsburg oil lead primer. The prepared linen is then stretched onto stretcher bars. Once a decision has been made as to the still life concept, I am able to choose a canvas which will best compliment it.

Stage One:

Using a large filbert bristle brush, I began by roughly blocking in the shadow patterns. At this
stage I don't worry about drawing, my aim is to place the objects in the 'space' on the canvas and to develop the design using the shadow structure.

This photo shows the painting a little further along in the initial stages. I've not only blocked in the basic shadow design/concept using my large brush and burnt umber/blue mixture, I've also blocked in the objects with some colour, mainly just to get paint on them. It's always difficult (for me, at least) to get paint coverage on this oil primed linen, in this initial stage, so I'm just concentrating on stating the colour scheme and getting that first coat of paint on. This allows me to make some judgement calls and also make any changes that I might deem necessary, too. I've managed to get a little further along in blocking in the urn. Since this is the largest object in the painting, and pretty much the star of the show, I want to get a feel for the size and value, and just how it fills the space on its own. So far I feel that it's holding its own...no need to haul in a bunch of flowers for support, just yet!

The important thing to note at this stage is that I'm not worried about drawing or detail, I'm using a large bristle brush and just getting a feel for the design - the flow of the light and how it will travel across my canvas. The paint is applied with little concern for smoothness. In fact, I love the quality of the scratchy surface caused by my bristle brush and will try to utilize this wherever I am able, as I go along. I've used my palette knife on the table edge. You'll also note that I have blocked in the basic value of the table top, as well.
...on to Step Two